Integration setup#
Information
MS Excel integration version 2.0 with advanced functionality, description of all the features below in the article.
If you only need to send a mailing and get the status of sent messages, use the Lite version
System requirements#
- MS Excel 2016 or higher versions
- Windows 10 or higher versions (Windows 7 support ended on 01/14/2020, so when using the table with earlier versions you may see errors related to software relevance)
Preparing for installation#
- Install the WhatsApp mobile application
- Registration in the console
- Create and authorize an instance
- Get access parameters to instance
Installation#
1. Download MS Excel spreadsheet#

Editable version for EXCEL developers
We strongly recommend using the latest version if you do not know how to program in MS Excel.
This version is provided for customers who want to explore the integration code.
Download the editable version of the table.
2. Unblock downloaded file#
Open the file properties with the right mouse button.
Check the "Unblock" checkbox.
Click the "Apply" button, then the "Ok" button.
If you cannot unblock the file, try moving it to the working folder.

3. Enable editing in MS Excel#
Select "Enable editing" in the Security Warning dialog.

4. Enable macros in MS Excel#
Select "Enable Content" in the Security Warning dialog.

5. Necessary authentication#
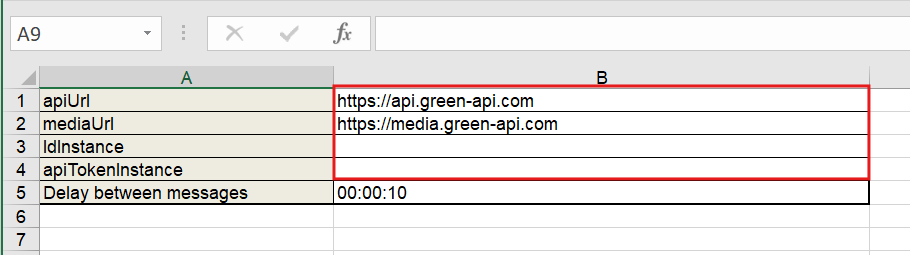
In the window that opens select the Parameters tab and add the following data from your GREEN-API console:
idInstanceapiTokenInstancemediaUrlapiUrl
When collapsing a table, the entered data may be reset. This is a feature of MS Excel, we recommend that when filling in data, you collapse not the table, but the browser.
If the window does not open automatically, click the 'API Methods' button to open it manually.
After filling in the data, click the "Check Authorization" button to check whether the instance is authorized and what phone number is connected to it.

Possible errors


apiTokenInstance is correct
idInstance is correct
apiUrl and mediaUrl are correctIf the fields are filled in correctly, the "Completed" window will appear:

Important information. Recommendations for sending.
The Delay between messages parameter is responsible for the speed of sending requests from the filled EXCEL table.
To change the delay in sending messages from the queue, use the SetSettings method with the delaySendMessagesMilliseconds parameter (see examples). Change the message sending delay from 500 milliseconds to 10-15 seconds (10000 ms - 15000 ms).
After that, change the Delay between messages value when sending to the queue on the Parameters sheet from 10 seconds to 1 second for the fastest sending of table processing.

Examplers of using:#
Instance authorization via an EXCEL table:#
Open the WhatsApp Business or WhatsApp application on your mobile phone. On your device, go to the Link a device section. To do this:
- On Android, tap on
the three dots->Linked Devices->Link a device. - On iPhone, go to
Settings->Linked Devices->Link a device.
Authorization via QR:
- In the
API Methodswindow, open theParameterstab and click theGet QR in browserbutton.You shall have Instance Parameters filled in

- A link to get the QR code will be automatically generated and copied

- Open the link in any browser and click the
Get QRbutton. Scan the code with your phone.

Authorization by phone number:
- In the
API Methodswindow, open theParameterstab.You shall have Instance Parameters filled in
- In the "Instance Authorization Methods" block, enter the phone number to connect, then click
Authorize by number

- A code for connecting the number will be generated automatically.

- Click on the pop-up notification from WhatsApp > Enter the code.
Unlock your phone (if you have the protection mechanism enabled) and enter the eight-digit code on the main device.
Read more in our article "How to set up device pairing?".
We also recommend that you read the article "Why can't I connect the device to the API?".
How to change the phone number?#
To log out the current number, check the box next to the Logout button and click on it.
This way, the phone number will be disconnected from the instance, and you will be able to connect another number.

How to reboot an instance?#
The Reboot instance button is needed to restart the instance if there are problems with authorization or in the operation of the instance.
To reboot an instance, on the Parameters sheet, click Reboot instance
